# Shared Hosting with Plesk
On many shared hosts you are not allowed to directly invoke node commands but you have to use the Plesk configuration
panel instead. Unfortunately, Plesk does not allow the interactive execution of node scripts. Therefore we can't use
Directus' init script and have to set up the project by our own.
Successful tests
This approach has successfully been tested with a webhosting offer from netcup.
# Setup database
First, make sure that you've already created a database and a user for it. We will use MySQL in this guide. When you plan to use SQLite you can ignore this.
# Setup a project folder
On the server, create a project folder with 4 files in it.
# 1. Add .env file
This file is used to configure Directus. Normally, the init script would create it for us. So now we have to do it
manually. You can just copy it from another Directus installation or use the
example file (opens new window) of Directus and then modify it (see
Environment Variables). You likely have to adjust the database information.
If you have not already a user in the database make sure to add a first user by adding the following two lines so that you can later login to Directus.
ADMIN_EMAIL="admin@example.com"
ADMIN_PASSWORD="password"
Choosing a Port
Since Plesk uses the Phusion Passenger (opens new window) application server to serve Node.js apps you do not need to worry about choosing a specific port. Just use an arbitrary number. To quote the Passenger docs:
When run in Passenger, the port number that you pass to listen() is irrelevant and has no effect. Passenger always makes the app listen on a random Unix domain socket.
# 2. Add package.json
Add Directus and your database connector as a dependency. To execute Directus' bootstrap command you also have to add
a script entry for it.
{
	"scripts": {
		"bootstrap": "directus bootstrap"
	},
	"dependencies": {
		"directus": "*",
		"mysql": "^2.18.1"
	}
}
# 3. Add application startup file index.js
Instead of a start command, Plesk wants a startup file. So create a index.js with the following content:
var { startServer } = require('directus/server');

startServer();
# 4. Add .npmrc
We need to make a small configuration for npm by creating a .npmrc file with the following content:
scripts-prepend-node-path=true
# 5. Add document_root folder
Lastly, we need to add a document_root folder inside our project-directory.
It's required by plesk that the document root must be a subdirectory of the application root directory. The folder can stay empty.
Store `document_root` in a version control
If you want to keep the folder in in a version controll like git, create a empty .gitignore file inside the folder.
# Activate and configure node.js
In Plesk, choose your website and click "Node.js". You should then see a button "Enable Node.js" and click on it.
Now, change the "Document root" and "Application root" to the location of your project folder. "Application startup
file" must point to the index.js file from the former step. The screen should now look like this:
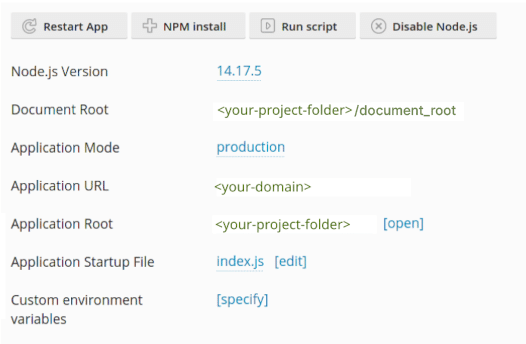
You can now install the dependencies by clicking on the button "NPM install".
# Bootstrap Directus
To set up the database tables (and the first user) for Directus, click on the button "Run script" and input bootstrap.
You get the console output after the script has run through.
Current Issue of Argon2
You may run into an error of argon2 telling you that glibc is missing. If that's the case try adding and running this script entry to your package.json:
    "scripts" {
        "argon2-rebuild": "npm rebuild argon2 --build-from-source",
        <...>
    }
Afterwards try bootstrap again.
# Use snapshots
On Plesk you can't directly run an npx command. To use the Directus snapshot feature, you'd need to add a script to your
package.json. For snapshot creation you can find an example in the
CLI docs: Date-based snapshots
To apply a snapshot you need a custom wrapper wrapper using the non-interactive version:
    "scripts" {
    	"apply-snapshot--noninteractive": "npx directus schema apply --yes ./snapshots/\"$npm_config_filename\"",
        <...>
    }
After that you can apply a snapshot by entering the following command to plesk:
apply-snapshot--noninteractive --filename=[file.yaml]
# Test Directus Access
The Directus app should now work under your configured url. If not, try changing the development mode and wait a couple of seconds.